I created a new layer and called it 'guide' this is where the lines that make up the face are going to be. I set my foreground colour to a bright blue and filled the layer. Now back on the original layer I selected everything (Ctrl + A) then on to the blue guide layer, I selected 'quick mask mode' from the left hand side, I then pasted the original layer onto this layer.
When I click off quick mask mode the guide layer now has all the white lines from the map selected. To give the selection more thickness I went to select, at the top, and then down to the modify panel, then selected border. This gives everything selected a more thick result.
With the map lines still selected, I applied a layer mask which preserves what I have selected and hiding the rest. Then I right clicked on the layer and applied the layer mask to the layer. Making the layer mask final.
The next part is to start applying the colour and texture to the face.
I kept the guide layer at the top so I always saw the lines as guidance. Then created new layers below it to start adding the skin textures. I opened up my high resolution photos that I took in the beginning, and using the lasso tool I cut pieces out and copied them onto the UV map render, building up the face as I went. The warp option within free transform was a handy tool for moving the skin around.
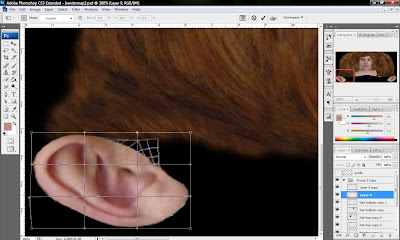
To texture the ear I used the same method as above, using the lasso tool and copied pieces of my ear on top of the UVW map. Making sure any empty black spaces were covered.
Below is the image of all the hair and skin placed over the map, ready to be imported back into 3ds Max. To make the whole image fit together I needed to cover up all the joints and lines from the different pieces of the face which were copied. This was done mostly with the clone stamp tool, by Alt clicking on a colour or area which I want to use, then painting that area over the lines and joints, making the whole image look much more fluid and realistic.
The clone stamp tool was a great help with creating and editing the hair around the head as well, as I could take different shades of colour from the hair and paint them in wherever I needed, it also allowed me to style the hair. This aspect was quite important because as you can see below my head is mostly hair.
Now to load up 3ds Max. The first time I textured the map and imported into Photoshop I ran into some problems with getting the texture to show correctly within 3ds Max. So with this being my second attempt on this section I spent more time and detail into getting it right.
Below is the first attempt.
This was what it looked like when rendered.
As you can see on that attempt I had weird issues with symmetry on the texture and it generally looks quite poor. Below is my second attempt.
This time I was much happier with the result of the texture, it came out without any problems and it looks much better. Now from here I can start adding more detail and making the face more realistic still.


Not looking too bad my friend, I think maybe on your UVW map you might wanna pull down the lips slightly to avoid the redness above the top lip but apart from that it looks quite good mate.
ReplyDelete